Tips & Tricks 35
|
These instructions will show you how to finish the dock project on the Dock Building Instructions page. |
|
Making a Fish's Back
| 1. | Click on the video to watch it on YouTube. This video will show how to use polymer clay to create and texture a fish's back to be placed in the water. |
 |
|---|
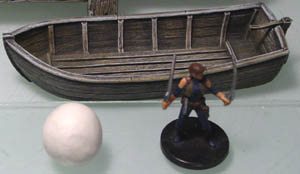
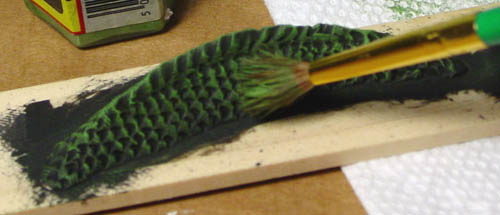
| 2. | To make this fish's back, I'm going to use polymer clay. This is the kind of clay that you have to bake at 270 degrees for 15 minutes per 1/4" thick. The brand I'm using is Sculpey and I'm using the original Sculpey. This clay is a bit softer than the other types of Sculpey but I'm used to it. You don't need much for a fish this size. I'm using a ball about the size of a marble for this one. |
 |
|---|
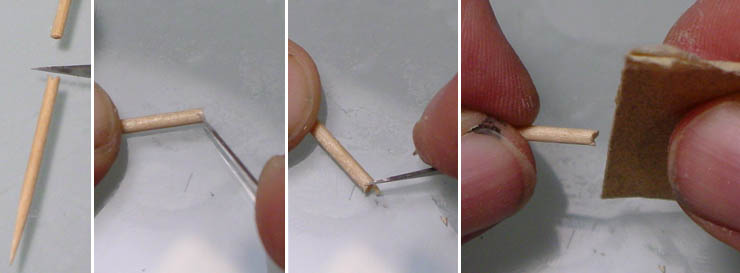
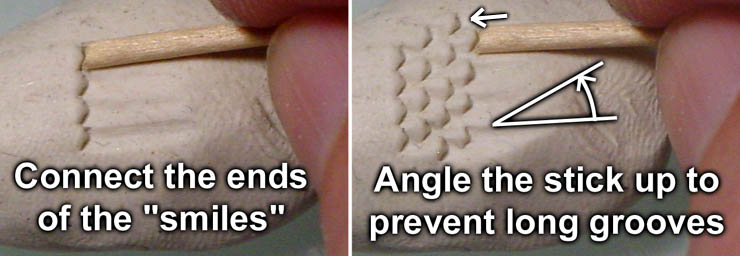
| 3. | In order to make the scale texture, I'm going to make a texturing tool from a round toothpick. Start by cutting the toothpick in half. Then you want to cut a shallow "V" shape into the end of the toothpick. Fold a piece of fine sandpaper in half and try to sand out a smooth smiley shape out of the end of the toothpick. This is what we will use to make the scales. |
|---|---|
 |
| 4. | Gently press the stick into the clay and it will give you a "smile" shape. Create a row of "smiles" that touch end to end vertically. Then place a row of smiles behind this row but alternate the placement of the row. Instead of simply pressing into the clay, try to scoop a little of the clay up by pushing the toothpick forward slightly. Also, if you find that you end up leaving a long groove behind the toothpick, shorten this groove by angling the toothpick down into the clay. |
|---|---|
 |
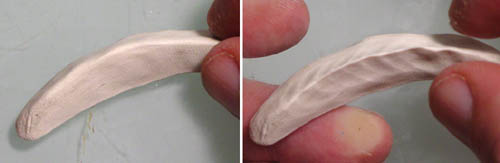
| 5. | Now for the real thing. Start by pressing out a moon shape onto a piece of glass. We're using glass because we need to bake the clay after we're finished. Next, pinch up the back to make the main fin that will stick up out of the water. |
 |
|---|
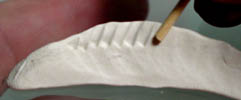
| 6. | Use the side of the toothpick to press in vertical grooves along the top of the fin on both sides. Also, gently slide your fingers along the sides of the fish to remove fingerprints. |
 |
|---|
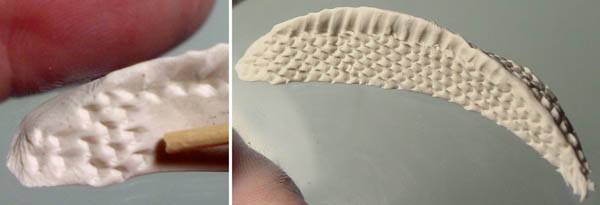
| 7. | Now do the texturing that you've practiced on both sides of the fish. Don't worry if you can't get rows to alternate perfectly. If you lose your place, just start a new row. |
 |
|---|
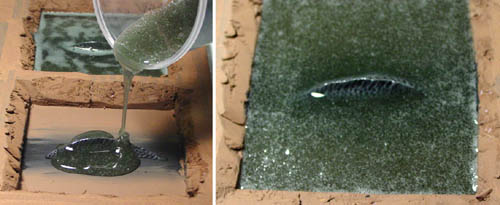
| 8. | I always try to make more than one object when sculpting and choose the best for the final project. Stick these down to something using double sided tape and paint them flat black. Then dry brush them medium green or whatever color you think will work for your situation. |
 |
|---|
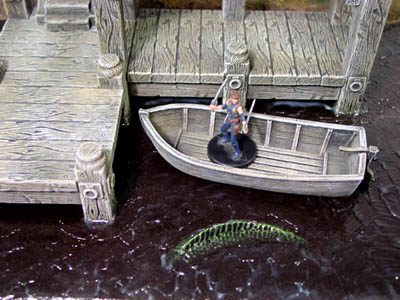
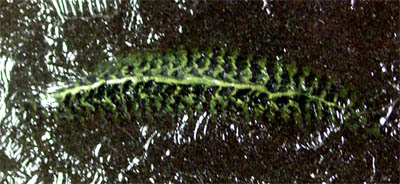
| 9. | Here's a sample of what the fish will look like underwater. The rest of this article will show how to make the water and top texture that this fish will be submerged in. |
 |
|---|
Testing Resin for Water
Before pouring resin on your actual model, it's always a good idea to make a test first to see if the colors will come out right. You will also need to have some idea of how much resin to mix up for your project.
| 1. | Click on the video to watch it on YouTube. This video will show how to figure the amount of resin to mix up as well how much colorant to add. |
 |
|---|
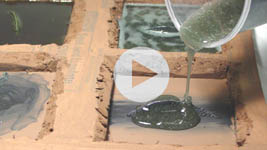
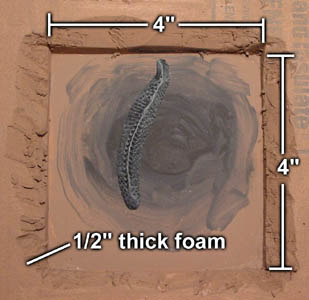
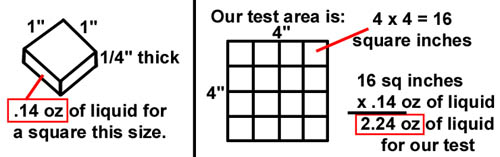
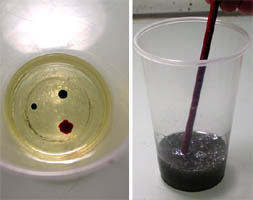
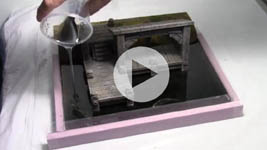
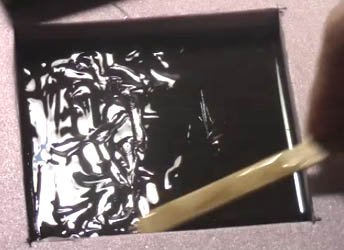
| 2. | The first step in making a test is to create a place to pour the resin similar to what you will do on the finished model. For this case, I have cut a 4" square hole out of a 1/2" thick piece of foam. Then I glued this 4" frame down to a piece of card stock and made sure the edges around the outside were sealed so that resin would not leak out between the foam and the card stock. Then I painted the bottom like I would on the finished model to see how it would look after I colored the resin and poured it in. I also glued in a spare fish to see how that would look as well. This test would not only be used for testing the color of the resin, but it would also be used for trying different wave texturing methods on the surface of the water. |
 |
|---|
| 3. | One square inch x 1/4" thick of area will take .14 ounces of liquid. Since our test area has 16 square inches of space, it will take 2.24 ounces of liquid to fill this test area. |
 |
|---|
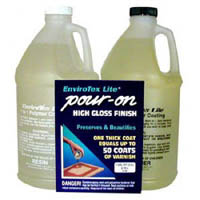
| 4. | The resin I'm going to use is Envirotex Lite but there are other brands that work just as well. It's a 2-part resin used to put a thick layer of varnish onto a table top. The easiest way to find it is go to your local hardware store and look in the paint department for something that will put a thick glossy coating simulating "50 layers of varnish" on a surface. Open the package and be sure that there are two parts that need to be mixed and you will have the right stuff. |
 |
|---|
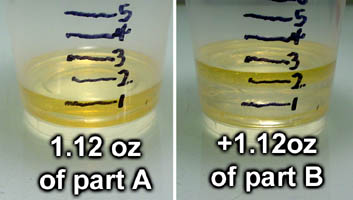
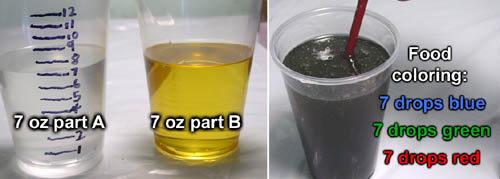
| 5. | Since we need 2.24 ounces of resin to pour into our test, that means we will need 1.12 ounces of part A and 1.12 ounces of part B. Here I'm using a reusable measuring cup. First pour in 1.12 ounces of part A and then pour in part B until you reach the 2.24 ounce line (approximately). |
 |
|---|
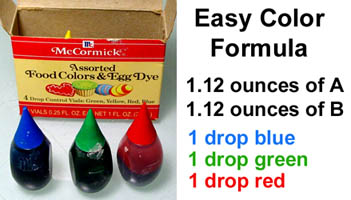
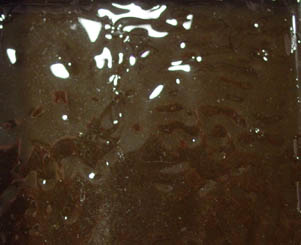
| 6. | To color the water, I'm using cheap food coloring that you can find at any grocery store. Not only does the color work out well but these little bottles have drop dispensers on the ends so that counting drops of color are easy. The color formula is one drop of blue, green and red for every two ounces of mixed resin. |
 |
|---|
| 7. | Drip one drop of each color into the resin. Mix this resin up well!. If you don't mix it well enough, it will not harden properly. Mix for 2 minutes at least. Also, before you pour resin into the test area be sure that your table is level and that you have covered your table with plastic of some sort.  |
 |
|---|
| 8. | When pouring the resin into the test area, you will notice it has lots of bubbles. This is OK because this resin cures very slowly so that the bubbles have time to come to the surface and pop. |
 |
|---|
| 9. | After about an hour most of the bubbles will have come to the surface and popped on their own. However, you can also take a paintbrush handle and run it along the surface to break any additional bubbles. At this point you can determine if you have the right amount of color in your water. In my case, I thought it looked OK but a bit dark. However, if I had to do it again I would probably have added less color. | 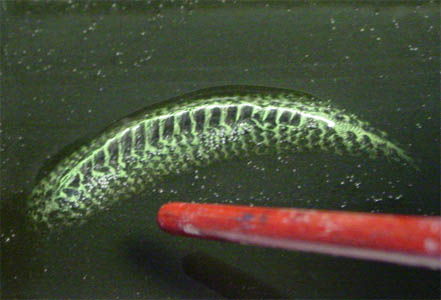 |
|---|
Pouring Resin Under the Dock
| 1. | Click on the video to watch it on YouTube. This video will show the steps on how to block up the sides of your layout and pour the resin. |
 |
|---|
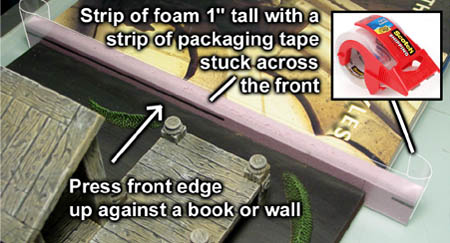
| 2. | To contain the resin, cut a 1" tall strip of foam a little longer than the front of the display. Cover the front of the foam with a piece of 2" wide packaging tape. Make sure the tape is glossy and be sure the tape completely covers the face of the foam all the way down to the table top. Hold the foam tightly in place by wedging it between a heavy book and the front of your dock. |
 |
|---|
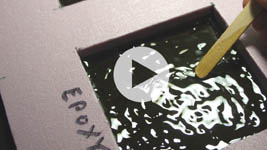
| 3. | Mix up some 5 minute epoxy and spread it along the front of the display. You want to fill the gap between the clear packaging tape and the water front so that resin will not seep between these two and get onto your table top. |
 |
|---|
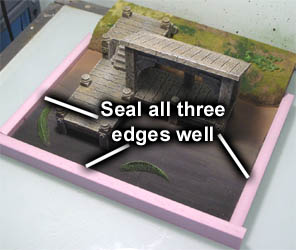
| 4. | You want to cut three pieces of foam, each piece will cover one edge of the water. Each of these pieces of foam will be covered with packaging tape. Be sure that you seal the corners well where the strips touch. Don't worry if you spread the glue a little too high up on the tape. We can trim off the excess glue later on. After the resin cures, it will not stick to the slick packaging tape and will pop off fairly easily. |
 |
|---|
| 5. | The resin I'm going to use is Envirotex Lite but there are other brands that work just as well. It's a 2-part resin used to put a thick layer of varnish onto a table top. The easiest way to find it is go to your local hardware store and look in the paint department for something that will put a thick glossy coating simulating "50 layers of varnish" on a surface. Open the package and be sure that there are two parts that need to be mixed and you will have the right stuff. |
|
|---|
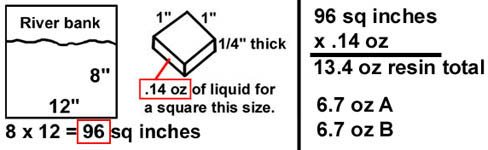
| 6. | For this project we have 96 square inches of water to cover. Since it takes .14 ounces of resin to cover one square inch, that would make 13.4 ounces of resin we need total. |
 |
|---|
| 7. | I'm just going to round the 13.4 oz. of resin up to 7 ounces of A and 7 ounces of B. To color the water I'm using 7 drops of each of the colors blue, green and red. |
 |
|---|
Looking back on the project after it was finished, I believe I should have added less food coloring to the water. If you take a look at the finished photos, it's very hard to see that I painted half of the river bottom black and the other half brown. If I had to do the project again, I probably would have used 5 drops of each of the colors instead of 7 drops.
One other thing I would have done is to mix the resin up more completely before pouring it. Be sure to mix the resin up for three full minutes in a large container that gives you room for mixing. My resin did not set up hard because I did not mix it well but I was still able to save the project.
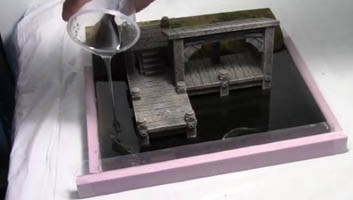
| 8. | Be sure to cover your table surface with plastic in case the resin leaks out. Also make sure your table surface is level or your resin will end up higher on one side. Once everything is in place, pour your mixed resin around your dock. |
 |
|---|
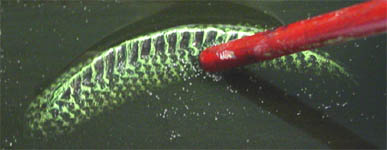
| 9. | One hour later, you can run a paintbrush handle across the surface to pop some of the small bubbles. These may pop on their own eventually but I just like to be sure. The small bubbles will tend to cling around objects such as the fish or dock posts in the water. |
 |
|---|
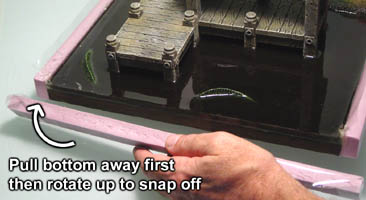
| 10. | About 24 hours later the resin should be completely hardened and you can snap off the outer foam strips from around the water. Grab the foam strip and pull the bottom away first. Rotate the strip upwards and snap it off from the side of the resin water. |
 |
|---|
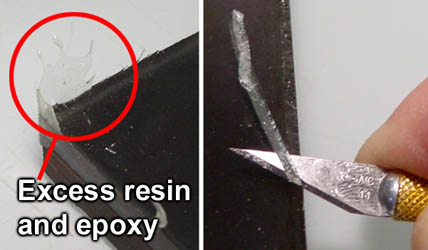
| 11. | After you pull off the strips, you will notice extra epoxy and resin that have crept up on the sides. Use a pair of scissors to trim off any areas that are very high up. Use a sharp new x-acto blade to trim off this excess plastic. The resin will be hard but you can still trim it off like hard plastic. |
 |
|---|
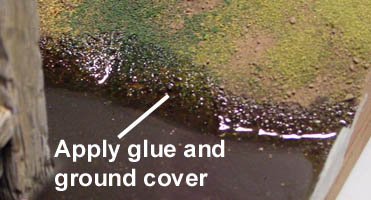
| 12. | Along the bank, you will notice areas where the resin had soaked up into the ground cover. This is easy to fix. Simply apply more glue over this area and sprinkle on more ground cover to cover this up. However, be sure the resin is fully cured and glossy hard before sprinkling any ground cover on top or it will stick into the resin. |
 |
|---|
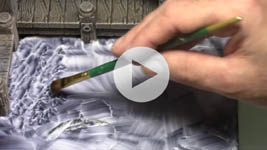
| 13. | Applying Texture to the Water This video will show how to use Liquitex Acrylic Gloss Gel Medium |
 |
|---|
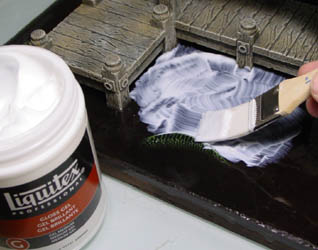
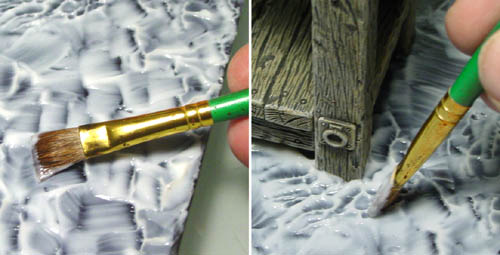
| 14. | To add texture to the surface of the water, I'm using Liquitex Acrylic Gloss Gel Medium. I'm using a 3/4" wide soft brush to apply a thin coat to the surface. Apply enough so that the entire surface has a thin coat but no so much that it's solid white. If applied too thickly the very thickest parts will not cure clear. Try to apply it so it looks about like what you see in the photo. This material takes a long time to dry so feel free to take your time. |
 |
|---|
| 15. | Once the entire surface is covered, I'm using a smaller soft brush to apply the texture. For the open areas of water, I'm laying the brush on its side and gently stroking the surface. On areas around the dock posts, I'm holding the brush straight up and down and poking the surface of the gel for a more rough texture. |
 |
|---|
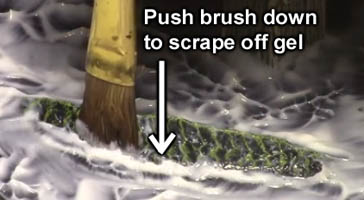
| 16. | Around the fish, you want to clean off the excess gel and let it pool up around the outer edge. To do this, wipe out the brush and then start at the top of the fin and scrape down towards the bottom of the water surface. Do this all the way around the fish back. |
 |
|---|
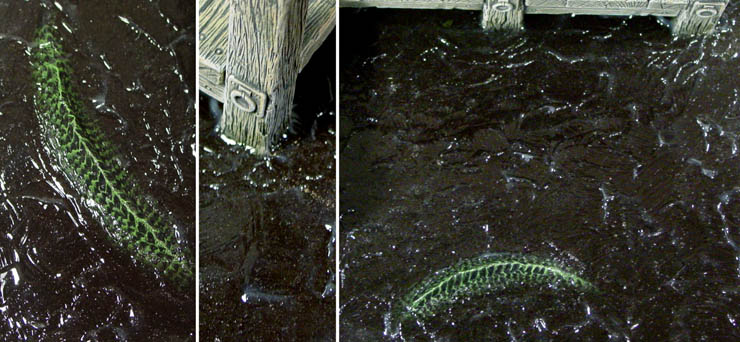
| 17. | About 24 hours later the gel will be completely dry. Here is a close-up of various parts of the water after it is finished You will notice that there are a few areas of thick gel that still have a bit of white to them even after five days of drying. These thick areas will probably never become clear so be sure to try the gel out on a test piece before doing your actual model. |
|---|---|
 |
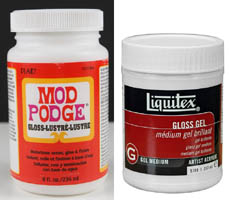
Gel Medium VS Mod Podge
| 1. | Click on the video to watch it on YouTube. This video compares the differences between Liquitex Gloss Gel Medium and Mod Podge. |
 |
|---|
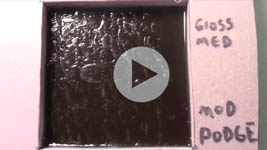
| 2. | I'm comparing the two products; Mod Podge and Liquitex Medium Gloss Gel. Both of these products are cleaned up with water, both take about 24 hours to dry and both can be used for water effects. The Mod Podge costs about $5.00 for 8 ounces and the Liquitex Gloss is about $16.00 for the same amount (as of November 2016). However, once you compare them side by side, you will see there is a big difference between how they apply to the surface. |
 |
|---|
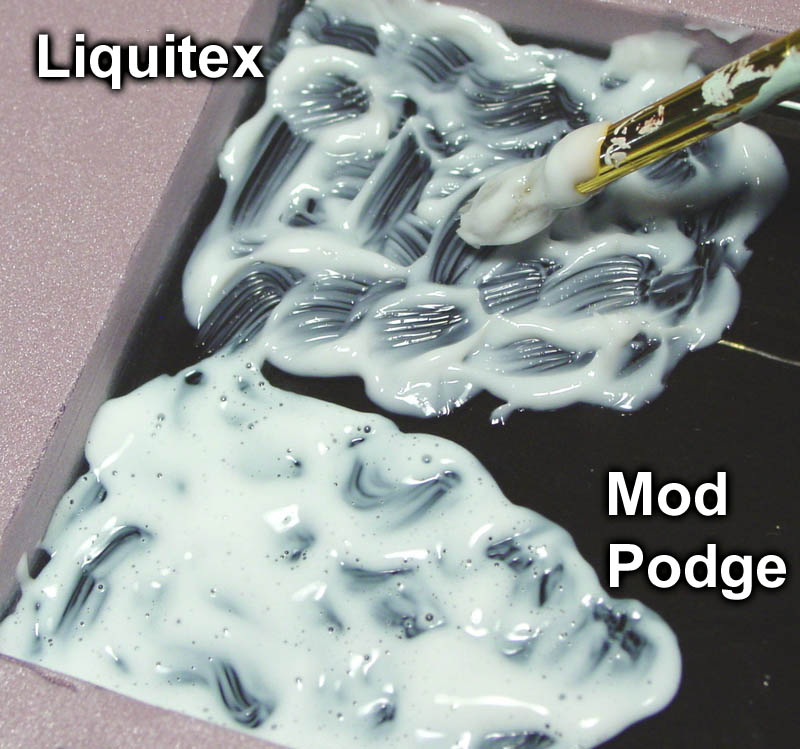
| 3. |
When applying these to your water, the Mod Podge appears to be like Elmer's white glue only a bit thicker. When putting it on, it holds it's shape somewhat but flows back a bit. In other words, it's pretty hard to see the brush strokes in what you do but it does not flow back completely smooth. The biggest thing I noticed about Mod Podge is that there were a lot of tiny air bubbles that I could not seem to get rid of. However, it does dry crystal clear so these tiny bubbles are not that much of a problem. Liquitex Medium Gloss Gel on the other hand is truly a gel. It's more of the consistency of mayonnaise and you can more clearly see the brush strokes when you push around in it with a paintbrush. The peaks are kind of soft though, so you can cover up the brush strokes fairly easily if you don't want them by using a softer brush and applying it more gently. The Liquitex also dries crystal clear (unless you put it on too thickly). Putting it on too thick is easy to do because it holds its shape so much better. As far as quality goes, I can definitely see why this product is more expensive when comparing the two. |
|---|
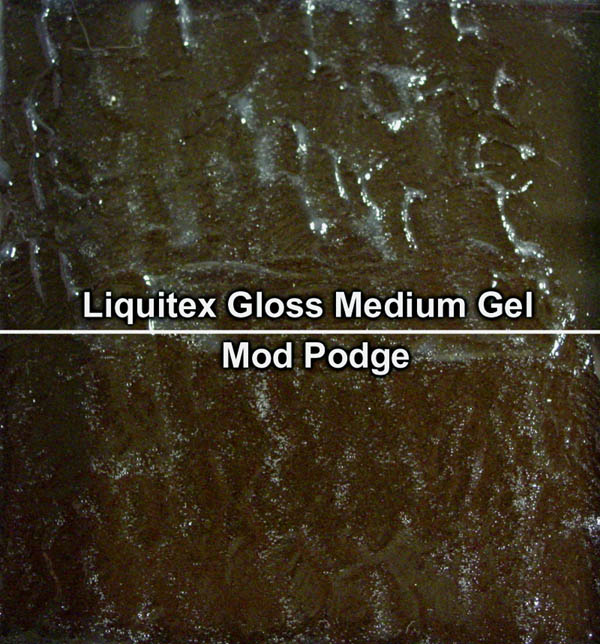
| 4. | Click on the photo for a closer view. The top example is the Liquitex after it has dried for 24 hours. You can see that the wave crests are larger and held their shape better. You will also notice that there are fewer air bubbles in it. However, the tiny air bubbles in the Mod Podge below don't seem to be out of place. They almost look to scale for foam you would see on top of the water. Overall, I think you have a bit less control over the Mod Podge, but it's cheaper and will do good job. I almost think it's better for hobbyists who are not sure how water is supposed to look. It provides a quick way to ripple up the surface without trying to figure out actual wave patterns. |
 |
|---|
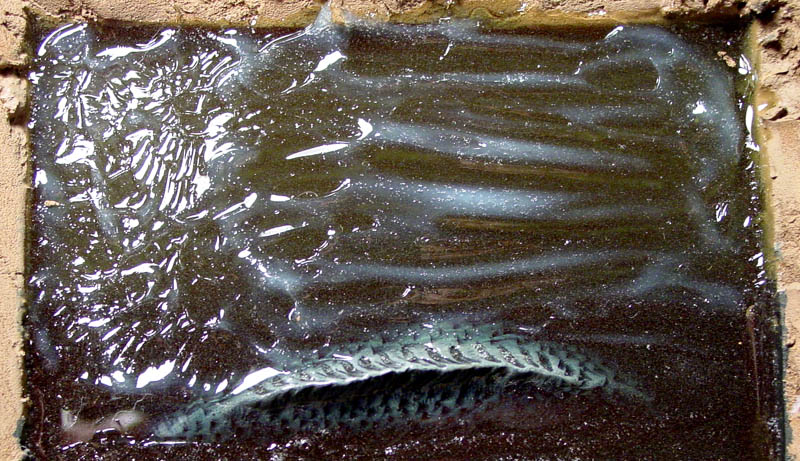
| 5. | One final note about Liquitex Gloss Medium Gel, if you put it on too thickly, it will not cure clear. Click on the photo for a closer view. For this example, I tried to make some very thick wave crests to see what would happen. As a result, you can see that it didn't dry underneath and stayed milky white. This was 4 days after putting it on! If you want larger wave crests, it's better to build up thinner layers and let each layer dry in between. |
 |
|---|
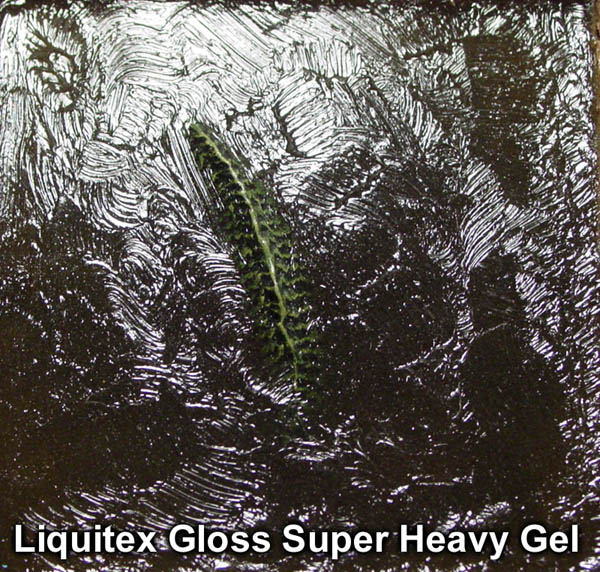
| 6. | I also gave Liquitex Gloss Super Heavy Gel a try just to see what would happen. Hey, if medium gel holds its shape well, wouldn't the super heavy stuff work better? I found that the super heavy gel showed every single hair on every brush stroke. I suppose it would work if I knew what I was doing with a brush. I think the high amount of texture was a bit distracting for the surface of the water. Click on the photo for a larger view. |
 |
|---|
Texturing Using Epoxy
| 1. | Click on the video to watch it on YouTube. This video shows how to use 5 minute epoxy |
 |
|---|
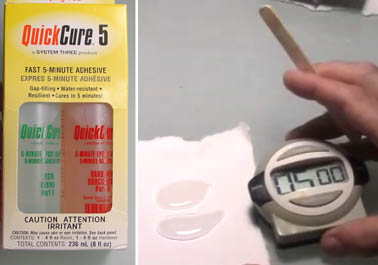
| 2. | I've used 5 minute epoxy for years when adding texture to water and still like this method. It gives you a softer wave pattern which works better for calmer water or thicker liquids such as a sewer or toxic waste. I wouldn't mix up more than a couple tablespoons at one time, or you won't have time to spread and texture it before it cures. Dispense equal amount of both parts. Set a timer for 5 minutes before mixing. |
 |
|---|
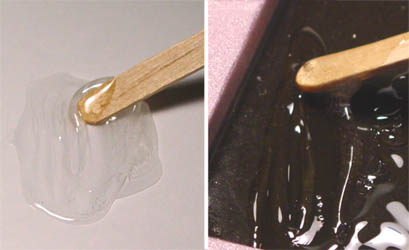
| 3. | You want to mix it gently and try not to work too many air bubbles into the mixture. Mixing for about 1 minute is fine. Drizzle it onto the area you want to cover and try to spread out a nice even coat. Five minutes should be plenty of time so spread out a couple of tablespoons of material. You can try to make wave patterns at this point but they won't stay. It should not start to thicken until the five minutes are up. Although that may depend upon the brand you are using. |
 |
|---|
| 4. | After 5 minutes you should feel the epoxy getting thicker. Work back and forth with the stick to put ripples in the water. It's very difficult to try and make a specific wave pattern so just scrape the stick around a bit. The epoxy will try to flow back smooth again but much more slowly. When the epoxy begins to string, that means your time is just about up. Put a few more grooves into the epoxy in places that have smoothed over too much. |
 |
|---|
| 5. | When finished, the texture will be a nice uneven ripple pattern. I like epoxy in general because of the quick setting time, it's easy to find at your local hardware store and it's not too expensive. One note of warning though, If you are using it over fishing line to represent water pouring out of a fountain, 5 minute epoxy will turn yellow after a couple of years. However, if you're putting it on top of colored lake water, you will never see it turn yellow because it blends into the natural brown-green color of the resin below it. |
 |
|---|
| 6. | If you want to use an epoxy that does not turn yellow, Ernie Phelps mentioned to me that he uses Epoxy 330 which he has used on jewelry for over 20 years without yellowing. These types of non-yellowing epoxy take longer to set up so it may be difficult to hold a ripple texture in the water. However, these would work great for water spouts and falling water where you use fishing line for the water stream and then spread epoxy over it. However, regardless of the epoxy you choose, test it out first before you use it on your final project. I have seen reviews on Amazon that on rare occasions people have received an old batch of epoxy that would not set up. |
 |
|---|
Using UV Cure Glue
| 1. | Click on the video to watch it on YouTube. This video shows the properties of UV cure glue and |
 |
|---|
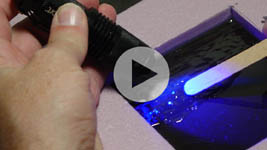
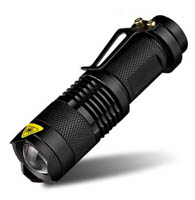
| 2. | UV cure materials are usually a gel that hardens when exposed to UV light. This is the same kind of black light you turn on in your room to make all of your 70's rock posters glow while listening to Led Zepplin. You can buy small UV flashlights to cure UV glue. This one only cost me $9.00 called the Fsmart SK68, but there are lots of choices. Not only can they cure UV glues, they can also be used to find scorpions, detect counterfeit bills and pick up trails of blood. |
 |
|---|
| 3. |
At first glance I thought it was the perfect solution. The gel is nice, thick and crystal clear. The problem is the curing time. This gel takes about 3 minutes to harden when exposed to UV light, depending on the strength of the light source. I could paint the gel around for some nice wave effects, but it would always flow down smooth again before I could get the material to set up. Because of these problems, I could not get this material to work for water effects. |
 |
|---|
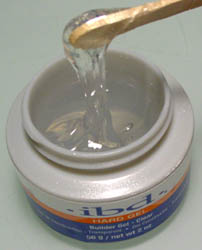
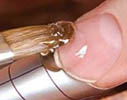 The first product I tried was ibd Hard Gel. This is a fingernail builder gel that cures with UV light. This is what a manicurist uses to create longer fingernails without gluing on plastic tips. Instead they place a form around your current fingernail, paint it on the then expose it to UV light which hardens it.
| 4. | The next product I tried was Xfactor Liquid Lock. It's kind of an off-brand UV cure glue. This 50ml bottle cost about $20.00. The viscosity of this glue is similar to super glue only a bit thicker. I'm trying out a bead about 1 inch long for this test. |
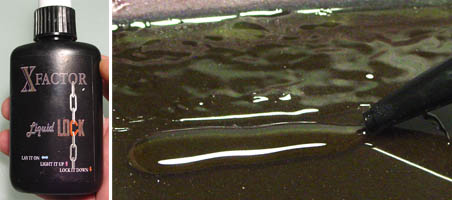 |
|---|
| 5. | OK, here's the problem with this. The gel does not thicken up when exposed to UV light. Instead its outer skin hardens quickly. In other words, you push around to try and make waves but the material is too thin to hold the shape. So you shine the light on it to thicken it up but instead you get a hardened skin that gets torn up while moving the stick around. It does cure hard quickly and stays crystal clear. It's just that the only texture you can make is a torn skin type of texture. |
 |
|---|
| 6. | This next product seems to work pretty well. It's Loon UV Clear Fly Finish - Thick. This little 1/2 ounce bottle is about $12.00 and it comes with a couple of squeeze tips and a brush similar to fingernail polish. This product is thick, about like 5 minute epoxy but cures a few seconds after you hit it with the UV light. That means you can make waves and they will stay in place long enough to harden it with the light. However, it cannot make sharp waves (like gel medium can) and is pretty expensive for only 1/2 an ounce. |
 |
|---|
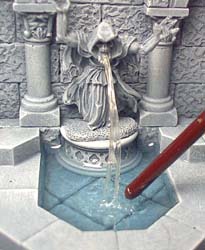
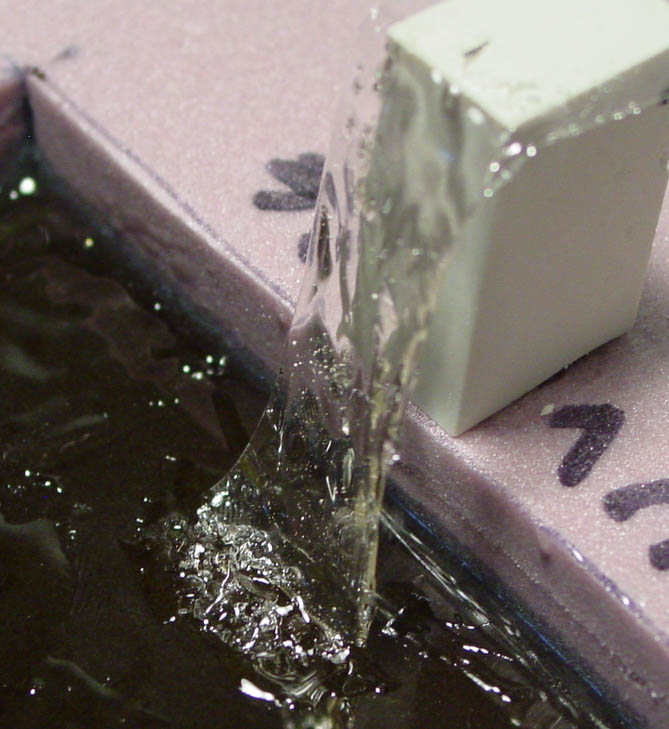
| 7. | This product may not be practical to cover your entire water surface with, but I did find a very good use for it. For this example, I'm using a strip of packaging tape to simulate a wide spout of water coming from above. I covered the tape using the Loon thick material and exposed it. Then I put some down at the bottom, and exposed it while poking it with a toothpick. |
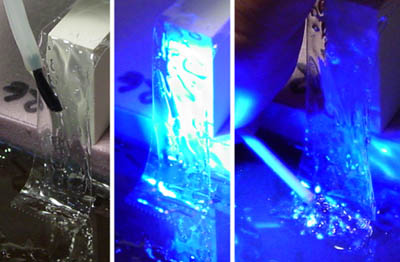 |
|---|
| 8. | Click on the photo to view a larger version of it. As you can see, this material cures quickly to a hard glossy finish and it stays thick long enough for you to put a bit of ripple in the water before curing it. You can also get a nice effect of splashing at the bottom by tearing up the gel while it's curing to give you sharp peaks. In the past I used to use epoxy for doing spouts of water but the problem is that 5 minute epoxy turns yellow after a year or so. This UV material will not turn yellow (at least not that I'm aware of). This material is expensive but for small projects like water spouts, I think it's quite useful. |
 |
|---|
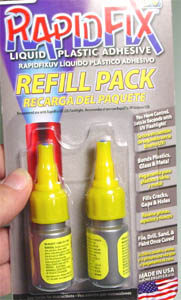
| 9. | The last glue I'm showing is RapidFix UV for automotive use. Here you get two 10ml bottles for $18.00. They also have a handy pack of one bottle of glue along with a UV flashlight for about the same price. This glue is thin like super glue so you won't have time to make waves with it. However it cures the fastest out of any of the glues I have used so far. About 2 seconds is all it takes to skin over. This probably would not work for flat water but it would be useful for water spouts and the splashes at the bottom of the waterfall. In conclusion, I think the product I like best is the Loon thick UV cure. Otherwise, the liquid lock and the rapid fix would tie at a close second. |
 |
|---|