Square Foot City Building Instructions
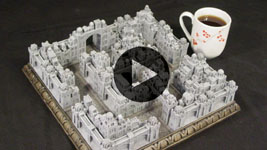
This small city is 1:285 scale also known as 6mm scale. The whole city only measures 12 inches square and is about 4 inches tall. The buildings are removable so you can use them with other small scale games.
|
To build the project shown here you will need:
This project requires about 15 pounds of dental stone. |

|
Building Instructions
| 1. | The Making of a Square Foot City This video shows the complete process of how I planned and built this city in time lapse video. There is no narration, just music and text for an explanation of certain steps. |
 |
|---|
| 2. | You will need a 12" square of some kind of base material to mount this city on. I chose to use a 3/4" thick chunk of wood. I chose thick wood because I'm wanting to add a decorative wooden trim around the outside when I'm finished. Be sure the piece is exactly 12" square. Sometimes wood labeled as 12" is actually slightly shorter. Many times the lumberyard you buy from can cut the piece for you. You can also use a 12" square ceramic tile, 1/2" thick insulating foam or any other kind of stiff material you like. |
 |
|---|
| 3. | Next you will want to glue down the tiles as the photo shows. Click on the photo for a larger view. The street tiles are shown in blue. You will also notice that the "T" and cross intersections are made up using two of the smaller tiles put together. Here I've used the 1.5" rock tiles from mold #208 but feel free to use any 1.5" square tile you like for this. When gluing these down, you may need to adjust the tiles by spacing them out slightly when gluing them down. I found that the rock tiles had a slight bit more room between them than what the street tiles had. |
 |
|---|
| 4. | Glue together the wall sections shown. The letters stand for the four corners; Northwest, Northeast, Southwest and Southeast. Click on the photo for a larger view. Be careful when gluing the corner towers to be sure they are pointing the correct direction. In all of these photos, the flat side of the corner tower should be facing you. There are only four corner towers used in all of these walls. The rest of the towers are straight wall towers. |
|---|---|
 |
| 5. | When set down on the board, they should look something like the photo shown. Click on the photo for a larger view. Don't glue the angles together yet. We will need to paint the wall sections first before we glue them together. By setting them up on the board this way you can check to see if the corner towers were glued on correctly. |
 |
|---|
| 6. |
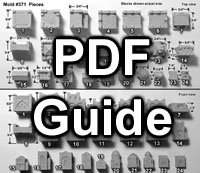
Open the PDF link on the right and print this out on your printer. This guide has assigned each decorative top block from mold #371 a number so you can easily see which block is needed in the instructions below. What you see in the photo are the interior buildings of the city that we will build next. Click on the photo for a larger view. Each of these building groups is also identified by a number which will relate to the instructions shown below |
 |
|---|
| 7. |  |
|---|
| 8. |  |
|---|
| 9. |  |
|---|
| 10. | Both towers here are straight towers (not corner towers). The top of the bridge here is the same level as the crenellations on the towers beside it. |
 |
|---|
| 11. |  |
|---|
| 12. |  |
|---|
| 13. |  |
|---|
| 14. |  |
|---|
| 15. |  |
|---|
| 16. |  |
|---|
| 17. |  |
|---|
| 18. |  |
|---|
Painting and Assembly
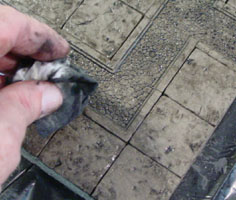
| 1. | For the streets I wanted a bit more of a dirty brown color so I started with a solid coat of dirt colored paint. You can find the exact color of dirt I used on my Painting Instructions page. After it dried, I gave it a coat of Kiwi liquid black shoe polish. After painting, try to remove the excess from the surface. |
 |
|---|
| 2. | Immediately after applying the shoe polish, dab off the excess using moist baby wipes. You will end up using several of these to do the job. You want to dab lightly and not remove all of the shoe polish. Blotches should remain on the surface which will flow back down into the cracks after setting a minute. If you end up removing too much of the shoe polish, just apply some more to the surface and dab up the excess again. |
 |
|---|
| 3. | After the shoe polish dries, I finished the street by dry brushing light gray over the whole surface. You can find the Castle Gray Light color I used on the Painting Instructions page. Be sure to do this very lightly and do not apply much of any gray at all. You want to keep the streets fairly dark but just pick up a few minor highlights. |
 |
|---|
| 4. | For the buildings, I gave them a coat of the Castle Gray Dark paint color which you can find on the Painting Instructions page. This coat of paint is thin so it can get down into all of the cracks and gaps. I actually mixed a little brown into the paint to make the color not quite so blue. After this coat dries, go back and paint any little white spots you may have missed. These will usually happen in the small windows. |
 |
|---|
| 5. | For the second coat of paint I used the Castle Gray Medium paint color which you can find on the Painting Instructions page. This coat dry brushed on using a medium pressure. For this color I also mixed in a bit of the earth tone medium brown to help cut down the blue color of the gray. This also helped the building color match better with the streets. |
 |
|---|
| 6. | The final coat of paint is the Castle Gray Light paint color which you can find on the Painting Instructions page. This coat dry brushed on using a very light pressure so that you only hit the edges of the buildings. Try to remove most of the paint from the brush before brushing and go very lightly with this color. |
 |
|---|
| 7. | To decorate the edge a bit more I added a decorative wood strip around the outside edge. Click on the photo for a larger view. I purchased this trim strip from my local lumber yard, mitered the edges to fit and then stained and varnished it before tacking them into place with finish nails. I then glued the castle walls around the outside edge of the square. |
 |
|---|
| 8. | I did not glue the buildings onto the streets though. I wanted to keep them separate so you could use them with other games. In this photo, I've place the buildings around a couple of CAV mechs from Reaper Miniatures. These are the 1:285 scale or 6mm scale. |
 |
|---|
Finished Photos
Click on the photos to see a larger view.
 |
 |